How to Setup a WordPress eCommerce Website Using WooCommerce Plugin?
WooCommerce is an open-source plugin for e-commerce, serving everyone from small business owners to large enterprises. WordPress eCommerce is a widely used option for online businesses because it offers flexibility and extensive customization. It can be a good choice if you want to:
- Maintain full control of your site and store data
- Avoid a platform subscription fee such as Shopify’s, while budgeting for hosting, payment processing, and extensions
- Start small and scale as your business grows
- Choose from several payment methods
- Use a flexible platform with an intuitive setup process
Also read: Top 10 WordPress eCommerce Plug-ins Compared
This guide will help you learn how to set up your eCommerce business using the WooCommerce plugin. Let’s begin.
Step 1: Set Up WordPress
First, set up WordPress with your domain name on a hosting server. Register for a domain and hosting plan from a reputable provider. You can compare providers such as HostGator, Bluehost, SiteGround, and other managed or self-managed WordPress hosts.
After registering your domain and hosting plan, install WordPress.
Step 2: Set Up the WooCommerce Plugin
WordPress plugins are easy to install. Go to your WordPress Dashboard, hover over Plugins, then click Add New. Search for WooCommerce in the search box.
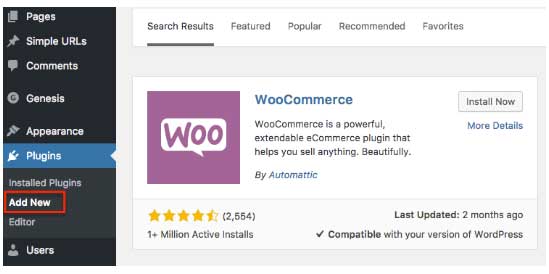
Click Install Now. After the installation finishes, activate the plugin.

After you activate WooCommerce, its onboarding wizard will guide you through the initial store settings. Click Let’s go to begin.

WooCommerce uses several pages for core store functions. The setup process can create these pages for you:
- Shop page – Customers browse your products on this page.
- Cart page – Customers review the products they intend to purchase.
- Checkout – Customers enter billing, shipping, and payment information and place their orders.
- My account – Customers can manage their account details, addresses, payment methods, and past orders.
Click Continue to move ahead with the installation.
Setting Up the Store Location

After creating or confirming the pages, enter your store address and choose the currency, weight unit, and dimension unit you will use by default.
Click Continue to complete this part of the installation.
Setting Up Tax and Shipping Details
In this part, configure whether you will charge tax and how you will handle shipping. Your tax obligations depend on your business location, where you sell, and applicable laws.
WooCommerce can provide tax settings and calculations, but it does not determine your legal tax obligations automatically. Configure tax rates carefully or connect a compatible tax service, and consult a qualified tax professional when necessary.
Enable the tax option if you need to charge sales tax or another applicable tax. You can configure shipping zones and methods in WooCommerce settings after completing the wizard.

Click Continue to proceed.
Setting Up a Payment Method
After entering your store and tax information, set up a payment method. WooCommerce supports multiple payment gateways, including WooPayments where available, PayPal, Stripe, and region-specific providers. Choose a gateway that supports your country, currency, products, and preferred payment methods; no single provider is best for every store.

Click Continue to move ahead.
Step 3: Choose a Theme for Your eCommerce Store
Now choose a theme that defines the design and layout of your eCommerce store. Select a WooCommerce-compatible theme that is responsive, accessible, regularly updated, and compatible with your preferred editor and extensions.
Storefront is a free WooCommerce-compatible theme maintained by the WooCommerce project. It is a reliable starting point, although it is not automatically installed with WooCommerce. Let’s get started with it.

After selecting your theme, check that your pages are clear, easy to navigate, mobile-friendly, and accessible. Many customers prefer clean, focused store designs.
Step 4: Add Your Products
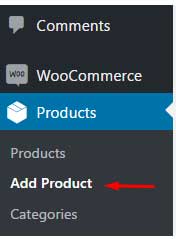
The WooCommerce installation is complete. Now you can add products to your store. Go to the WordPress Dashboard, hover over Products, and click Add New.

Fill in the sections with your product information:
- Product name
- Description of the product: Include the product’s features, specifications, images, and other relevant information. You can also add useful links in this section.
- Product data area: Select the type of product you are selling, such as a simple, variable, grouped, external, virtual, or downloadable product. The available settings may vary depending on the product type. Common sections include:
- General
- Inventory
- Shipping
- Linked Products
- Attributes
- Advanced
- Product Short Description: Add a concise description that appears near the product title and purchase options.
- Product Categories: Assign the product to one or more relevant categories.
- Product Tags: Add tags to help organize and filter products.
- Product Image: Upload the main image for the product.
- Product Gallery: Add additional product images or a collection of images.
Once you have filled in all the details, click Publish. You’ve successfully added your first product to your store.
Over to You
In this tutorial, you’ve learned how to set up WooCommerce on your WordPress site, configure the essential store settings, choose a compatible theme, and add a product.


@
You say PayPal is recommended for receiving payments. What’s wrong with Stripe?
@
Nothing is wrong, but stripe is not available in all mojor countries.
@
Yes